
Installation in four steps
Anchor points are intended for situations where a permanent guardrail is technically not feasible. Applied correctly, our anchor point is a fully certified and responsible choice - exactly what the product was developed for.
Full bonding of the anchor plate
Adhesion to the bituminous roof covering forms the load-bearing connection of the anchor plate. Bitumen flowing through the perforations shows that the material is sufficiently plastic, but it does not prove that the underside of the rigid plate makes contact everywhere with a possibly uneven roof surface.
Key point
The connection requires both adhesion at all contact surfaces and sufficient cohesion in the bitumen layer. Both only work properly when the plate is pressed down over its entire surface.
Installation on bituminous roof covering
01
Heat the substrate carefully
Heat the existing bituminous roof covering evenly and in accordance with the roofing manufacturer's application instructions. Avoid local overheating or damage.
02
Apply and roll the second bitumen membrane
Apply the second membrane fully over the anchor plate and immediately roll it in evenly. Bitumen flowing through the perforations is desirable, but it is no proof of full surface adhesion to the lower roof covering layer.
03
Press the plate down fully and evenly
A roller presses the top layer down well, while the rigid plate bridges small irregularities in the substrate. Therefore, while the bitumen is still sufficiently warm and plastic, carefully stand on the covered plate wearing clean, dry, flat-soled safety shoes. Distribute the pressure over the centre, edges and corners; do not twist or slide.
04
Check adhesion thoroughly
Check flatness, edges, creases, blisters and displacement. Because the underside of the plate is not visible, the installation method must be followed consistently. In case of doubt, or when the substrate, material combination or weather conditions change, carry out a trial installation and an appropriate adhesion test.
From flow-through to surface adhesion
Follow the three images in order. Bitumen flowing through the holes alone does not guarantee full contact under the plate.
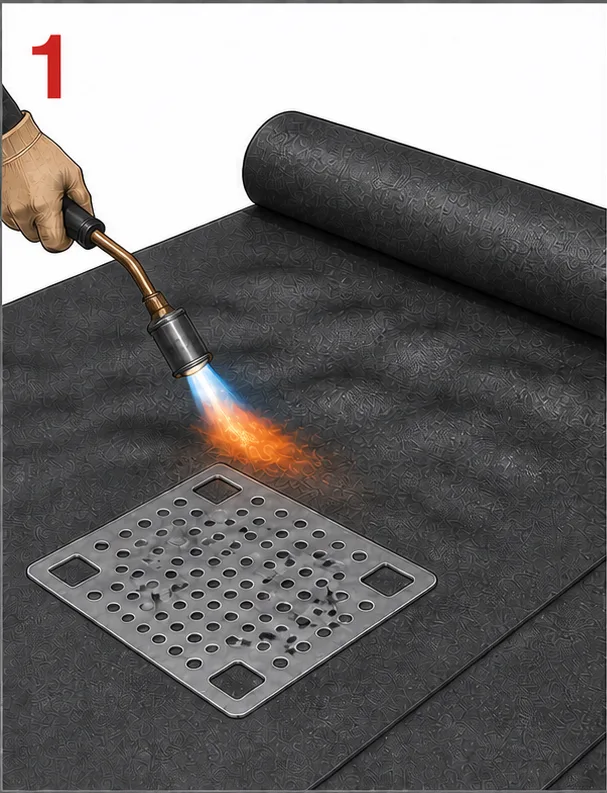
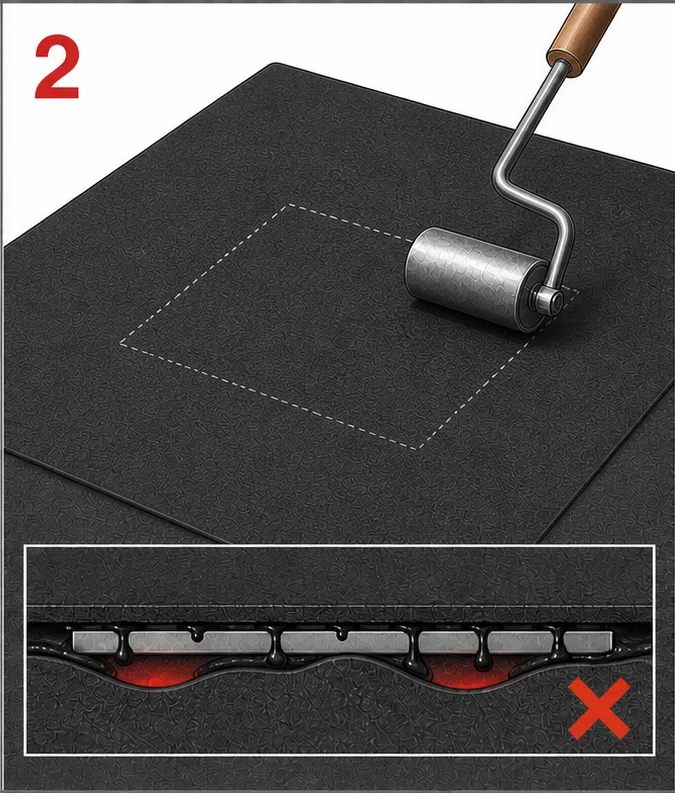
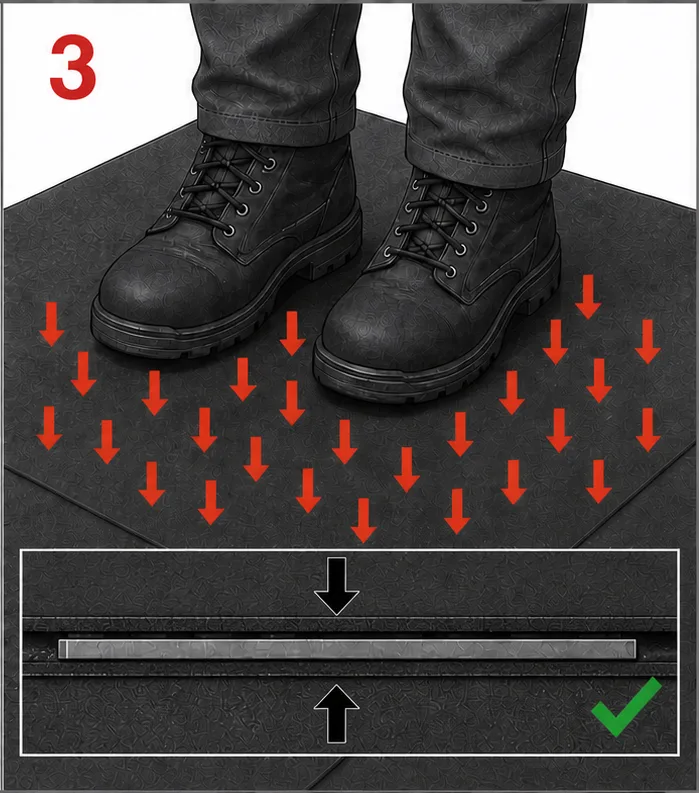
Goal: maximum actual contact area between plate, bitumen and the lower roof covering layer.
Adhesion bonds to the surfaces; cohesion holds the bitumen layer together under load.
Extra attention for lifeline systems
In a lifeline system, the start, end and corner anchors can be subjected to continuously higher loads due to the pretension. Only put the system into use once it has been established that the anchor plate is fully (100%) and durably bonded to the roof covering layer.
Technical basis: The Dutch roofing guideline Vakrichtlijn gesloten dakbedekkingssystemen 2025 specifies, among other things, flatness and suitability of the substrate, 100% adhesion for fully bonded layers, a bonding layer across the full width, firm pressing and regular adhesion tests. These practical instructions do not replace the brand-specific application instructions.
Vakrichtlijn gesloten dakbedekkingssystemen 2025 (PDF, VEBIDAK, in Dutch)Technical documentation
Declarations of performance and installation manuals in accordance with the Construction Products Regulation (CPR 305/2011). Keep these documents as part of your installation file.
Declaration of Performance (DoP)
Declaration of Performance in accordance with CPR 305/2011 - CE marking, RISE certificate 12 71 01
Installation manual
M-085EU (general) · M-350 (bitumen) · M-349 (EPDM/PVC) - including adhesion test protocol
Bitumen installation instructions
Practical instructions for full bonding of the anchor plate on bituminous roof covering, with visual installation sequence
Keep all documents together with the project-specific installation file (substrate type, installation conditions, inspection report). This file is required as the equivalent of the structural calculation under Annex I condition no. 20.